I am currently in Johannesburg and will only be returning to the Madikwe Game Reserve towards the end of the month.
This has left me with quite a bit of time to look through old images, make updates on the site (thanks to Mike from FenPhotography for some tips on image sizes in the Blog - larger images look great!!) and just in general miss being out in the field!
I have been doing a lot of reading which, combined with the fact that I am stuck in the concrete jungle, led me to do this Blog.
You know when you like a picture. You might not know what it is that makes you like it. You just like it. Over the next few weeks I will look at various of the images that have been uploaded to the Photo-Africa Stock Library and pull them apart with regards to composition, exposure and other factors that we all read about in Photography magazines and hear about in courses.
So let's start with a look at Lines & Shapes in wildlife and landscape images.
Like anything you need to train your eye to see lines in shapes while composing your images. In wildlife photography this is sometimes quite, cancel that, very challenging as you are in the wild and "the damn lion just won't play along!!"
It is however still good to try and keep lines and shapes in mind when looking at an image through your viewfinder. Before we look at a few sample images a quick breakdown.
Diagonal Lines
Diagonal lines are definitely the most interesting lines you can use in a photograph. The addition of diagonal lines in your image creates a kind of a conflict that is visually exciting and makes for a much better all-over image. They can be used to lead the viewer's eye into and out of the image or highlight your focal point.
Vertical Lines
These lines gives a very dynamic and strong feeling to an image. Height can be conveyed with these lines and will normally go along with a portrait rather than a landscape image. The height of the vertical line will be echoed by the long side of your frame giving a visually appealing feeling to the image.
Horizontal Lines
One to be careful of. Vertical lines tend to be a lot more calm and peaceful than the other types and will normally be used in landscapes where the horizon runs through the frame. First off, if your horizon is skew - images gone! You must also make sure to not cut your image in half by putting the line dead center in the frame but rather raise or lower it when shooting to emphasize your focal area. I.e. move horizon down the frame to focus on the beautiful sky.
Shapes
By combing the mentioned lines you can create shapes. Square or a rectangle that mimics your frame is not as visually appealing as something like a triangle that creates a bit of conflict in the frame. It keep is interesting and comes back to the rule-of-thirds which also relates to 'everything in threes' but more on that later.
So with that in mind here are a few examples of how lines can be used to create great wildlife and nature images.
Example 1
A great image of a Madikwe Sunset. Apart from the colors that are very appealingly, the use of lines makes this a great image. The breakdown:
The horizontal line has been used perfectly - a straight line that has been dropped slightly below the center of the frame to keep the focus on the sky. The repetitive diagonal lines in the clouds keep it interesting and almost pushes your view to the bright golden clouds in the right of the frame.
Example 2
Great landscape of a dead tree. Taken slightly from below, the height is emphasized and the diagonal lines all lead your eye to the focal point - the clouds. The breakdown:
Great use of lines. The diagonal foreground finishes the image nicely at the bottom and starts moving your view up the tree. The vertical line of the tree gives it nice height and the the diagonal lines formed by the branches lifts your view up towards the clouds. It almost looks like the branches are 'carrying' the clouds.
Example 3
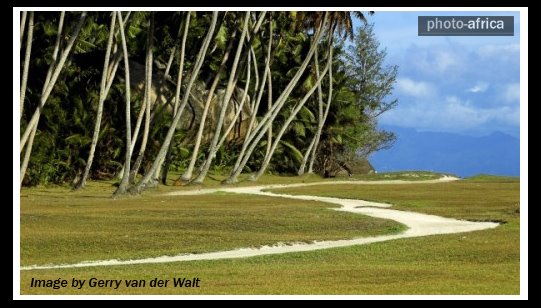
A very normal landscape image that has 'something'. It makes you want to look to the right of the frame. The breakdown:
The winding road leads you, whether by s-curve shape or combined diagonals, to the blue sky. The 'movement' is assisted by the trees all leaning in towards the open area. The red diagonal lines assist the movement and the green diagonals (or s-curves) keep your eye moving to the top right of the frame. The white lines show the 'power points' of the image (where the white lines cross - according to the Rule of Thirds) and is very close to where all the lines lead your view.
Example 4
An interesting image of a person next to a tall tree. The image definitely conveys height and you truly get to see how tall the tree is. The breakdown:
By combining the vertical lines, portrait layout and the person next to the tree for comparison you get to see how tall the tree really is. If this image was a landscape without the person in the image it would have been damn near impossible to get any idea of how tall the tree is. Another nice aspect (not illustrated) is the horizontal line that gets created by the rocks in the top of the image. Finishes the image of nicely.
Example 5
A striking image if a Shaft-Tailed Wydah on a dry tree. The breakdown:
Firstly the focal point, the bird, is placed perfectly on one of the power points (will do a Blog on this later when looking at composition). The use of diagonal lines and the triangle shape gives this image that 'little bit extra'. The triangle makes, as always, the image a little more exciting. The diagonal line all work together to highlight the bird. Great example of using lines & shapes in wildlife photography.
A lot of the times when photographing wildlife you will not have time to check for lines and shapes as you need to try and keep up with the action. Over time your eye does get trained and you see these lines and shapes much quicker so the old saying still holds true - practice makes perfect! It is those times that you do include it, whether planned or just by plain luck, that an image will have that little bit extra and stand out above the rest. Something to think about next time you go shooting wildlife and landscape images. Will have a look at some of the images on Photo-Africa and next time look at all the various factors influencing Composition and after that Exposure.
One more thing before I finish off. Why is it that people want to change their camera bodies more than I change my socks? The moment a newer camera body gets announced they just have to have it! Hey, I like my toys as well but damn! Have you used even half of the functions on your camera? Are you ever going to actually to print anything that big that warrants you having one extra megapixel? Do you have any idea how the bracketing feature on your camera works? Do you really need to shoot at 9 fps when photographing your cat or grandmothers cakes? All on automatic?
It feels to me that for someone, who does not shoot professionally, to get a newer camera body "to take better pictures" is like a fish getting a bicycle to swim better... It does not make sense!!! Why not rather spend money on a lens or a course of sorts so that you can learn to take better images with your current body? Just a thought... and with that I'll get off my little pedestal and go and see what is for lunch! :)
As always I look forward to your comments!
Until next time!
Gerry
.jpg)


4 comments:
Thank you for the nice explanation of the use of lines and shapes in wildlife photography.
Looks great Gerry, I have to agree the larger images look much better especially when viewing the weekley high 5. Nice tips here something I will definitely be trying to take into account when out and about, look forward to seeing more of these posts. Mike.
I luv the pics and explinations. They've given me grea ideas for my geometry project.
I luv the pics and explinations. They've given me grea ideas for my geometry project.
Post a Comment